Like this free tool? You can support me by subscribing to my YouTube Channel, checking out my Tech Blog, following me on Twitter, or tossing some change into my Tip Jar.
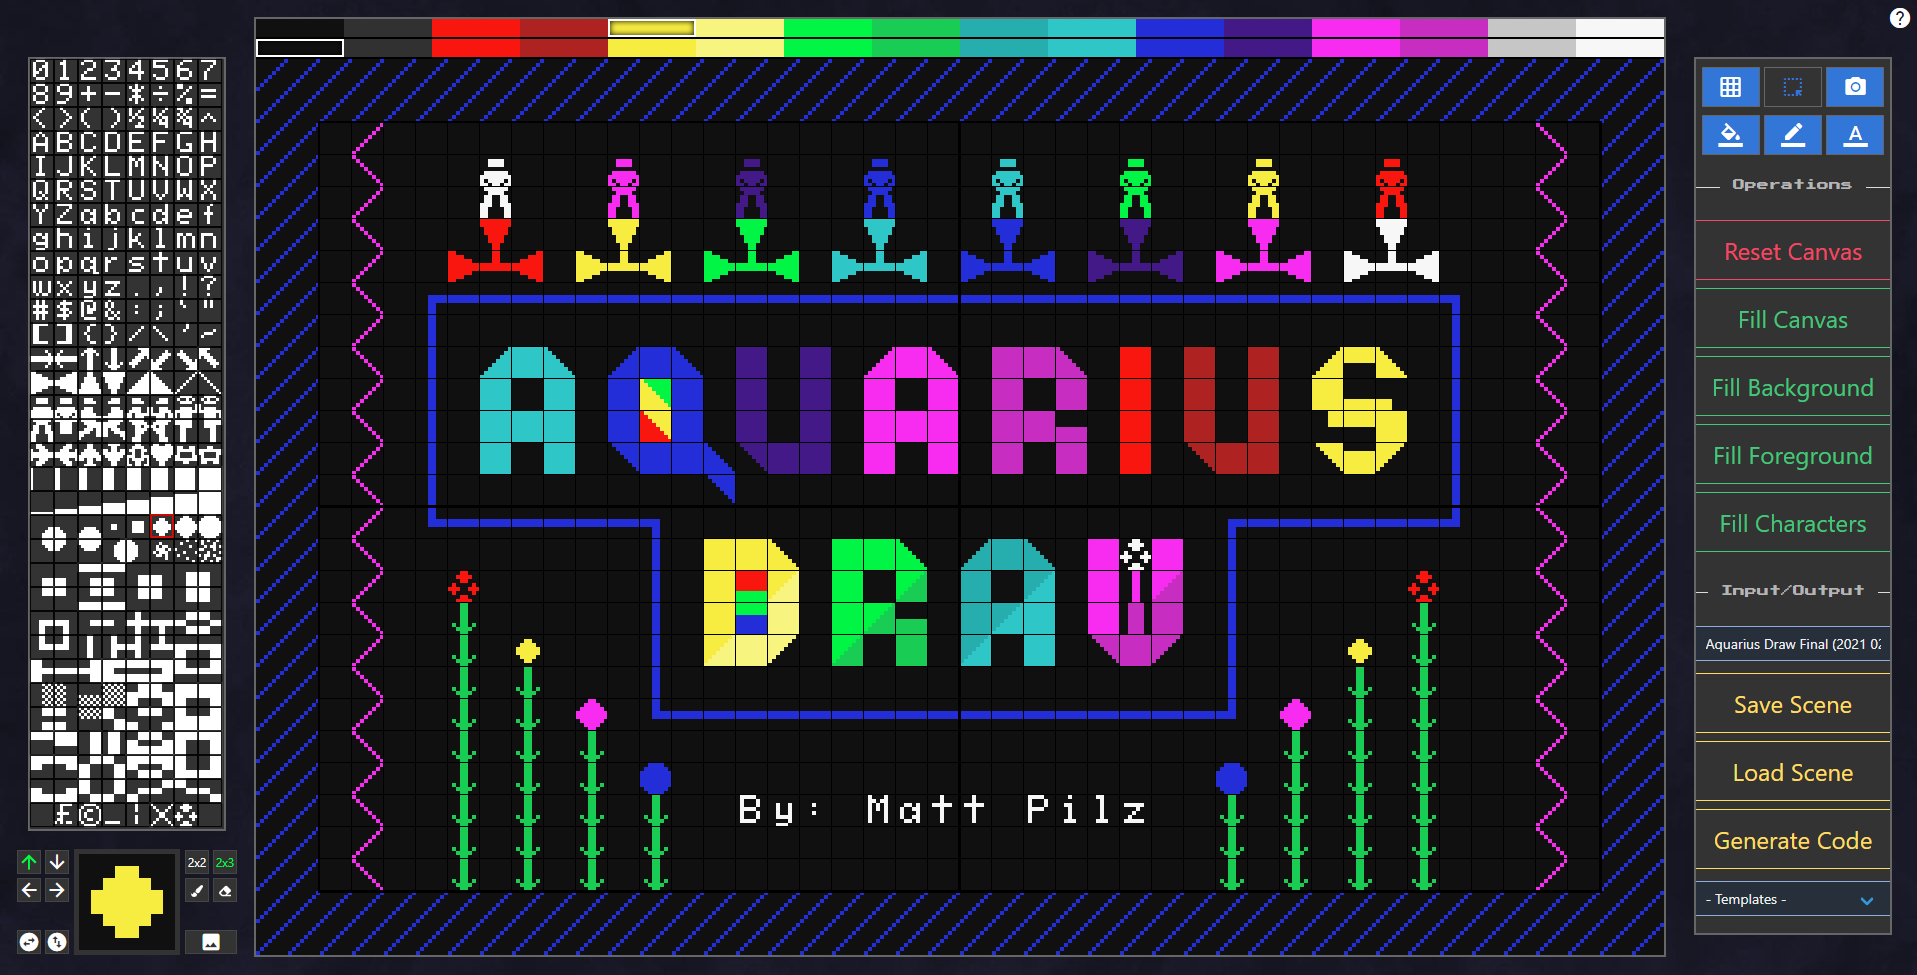
Aquarius Draw was developed to rapidly assist with prototyping, art and design work with respect to the technical limitations imposed by the Mattel Aquarius home computer (1983). Additional enhancements are provided to support the modern Aquarius+ computer including character ROM loading/editing/saving, basic sprite editing and custom color palettes. It also serves as a general purpose utility for producing authentic retro art that can be easily exported for further manipulation or external use. The web-based application includes a comprehensive and faithful reproduction of the original character set and restrictions of the Aquarius hardware, but with an intuitive and modern paint-like interface.
In addition to designing simple-to-complex scenes, Aquarius Draw can also generate saveable, copy-paste ready BASIC and ASM (machine language) output. This provides an immediate method for transferring your creations to physical or emulated devices, and makes it easy to programmatically expand the template code into the app of your dreams. The created artwork can also be previewed in various ways and exported as PNG or submitted to the online gallery. You may press F1 in the application to display a keyboard shortcut cheat sheet.
Feature Summary
- 256 Character Selector (Sorted and Original Order)
- 16 Color Background and Foreground Selector with Invert Option
- 40x24 Drawable Canvas Area and Personalized Border
- Bloxel Functionality Including Image Import, 2x2 and 2x3 Bloxel Drawing
- Large, Realtime Preview of Selected Character/Color Combination
- Numerous Toggles and Actions to Fine-Tune Drawing Operations
- Grid Overlay for Clear Distinction of Tiles and Center Point
- Tile Inspector Stats for User Reference
- Input/Output Actions for Saving and Loading Scene Data
- Customizable BASIC and Machine Language (Assembly) Code Output
- Dynamic Preview of Output with CRT/Monochrome Simulation
- Export Scene Images as High Quality PNGs
- Tile Selection Tool with Cut/Copy/Paste Capabilities
- Pre-populated Templates (Title Screen, Demonstrations and Examples)
- Tile-specific POKE Data Generation (Raw, with Lines or as DATA Rows)
- Optional Public Gallery Upload for Showing Off Your Creations
- Quick-Type Text (Click into Origin Tile and Type Away)
- Directional Offsetting to Move Specific Rows/Columns in Specified Direction
- Fast Fill to Quickly Populate Rows or Columns with Selected Brush
- Aquarius+ Compatible: Load, Edit and Save Custom Character ROMs
- Aquarius+ Compatible: Enable 8x8 Sprite Grid Mode to Design or Load Sprite Imagery
- Aquarius+ Compatible: Customize the Color Palette, Save/Load Palettes and Generate BASIC Data
- Aquarius+ Compatible: Optional 80-Column Mode
- Aquarius+ Compatible: Screen Memory Dumps with Preserved Color Palette, Alternate Border Bytes
Aquarius Draw is a web-based application designed for modern browsers that support HTML5, ECMAScript 6 and WebGL. Aside from a few external dependencies and optional Gallery Upload feature, the application's operations are client-side and handled locally on the user's computer (e.g., the file saving, image generation and drawing operations are all client-based).
The recommended resolution is 1920x1080 (Fullscreen - F11!) using Chrome, but it should also work fine in the latest versions of Firefox or Edge and at other resolutions using the browser's Zoom capabilities, see note below.
Browser Zoom Scale Factors
Running Aquarius Draw fullscreen (F11) is highly recommended to optimal experience.
Since Aquarius Draw is built around pixel-perfect accuracy mapped to the technical capabilities of the original Mattel Aquarius hardware, certain resolutions and zoom settings are optimal to mitigate distortion or undesirable scaling. Below are the recommended guidelines, based on the default 100% device display scale.
Most browsers allow you to adjust the zoom setting via CTRL + MOUSEWHEEL UP/DOWN. As you adjust the zoom level, the browser should indicate what percentage has been set. Other keyboard shortcuts to achieve the same result include CTRL + (Zoom In), CTRL - (Zoom Out), CTRL 0 (Reset to 100%).
- Browser Zoom: 50% - For 720p or Lower Resolutions, as Low as 940x490
- Browser Zoom: 75% - For Resolutions Less Than 1080p, such as 1440x900
- Browser Zoom: 100% - For 1080p Resolutions (Fullscreen Recommended)
- Browser Zoom: 125% - For 1440p Resolutions
- Browser Zoom: 200% - For 4K Resolutions
I recommend that you adjust your browser's zoom level the first time you launch Aquarius Draw so that all components nicely fit within the visible viewport, at a level where the gridlines are crisp and show no artifacts or clipping. Once adjusted, each time you return to Aquarius Draw the settings should apply automatically.
(Aquarius+ Update: The modern Aquarius-compatible 8-bit computer, Aquarius+, supports dynamic swapping of character ROMs. Aquarius Draw has been updated to include a fully integrated character editor. For details on this, please refer to the Character Editor section.)
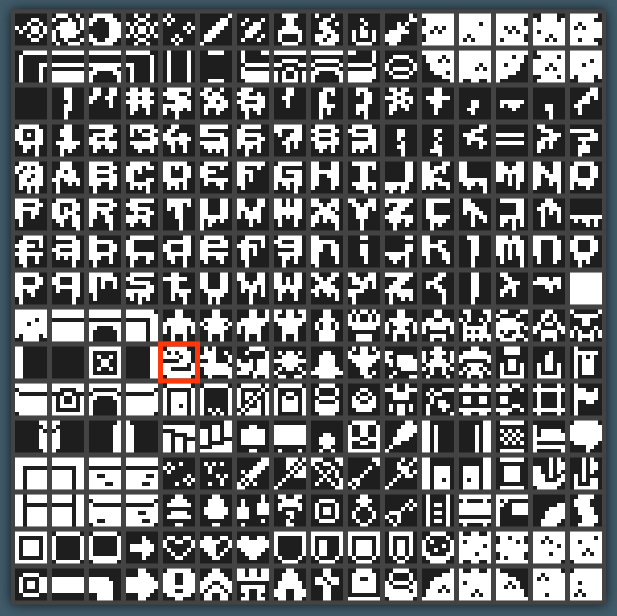
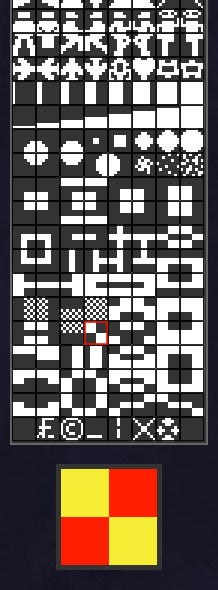
Aquarius does not have any dedicated VRAM or GPU. Instead, all on-screen visuals—including text and imagery—must be created using the fixed 256-glyph character set (with IDs of 0-255) across a 40x24 grid [technically 40x25, see Grid section for details]. In this way, the graphical component of Aquarius behaves more like ASCII/ANSI text-art than pixel-based (sprite) architectures. That said, "limitations foster creativity" and there is enough variety within the set to design creative and clever visuals—especially by inverting the background and foreground colors for particular effects.
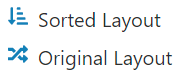
For your convenience, the character set is available in two different modes: Sorted and Original. The sorted order includes more logical groupings of the characters compared to their actual order within the character ROM and is the default arrangement when the application loads. The original order follows the hardware's 0-255 allocation top-to-bottom and may be useful for manual bloxel design or programmatic considerations. The ordering can be switched from the context menu when you RIGHT-CLICK the character panel.
 KEYBOARD SHORTCUTS: You can advance through the character set using the number pad on your keyboard. Use NUMPAD + and NUMPAD - to cycle to the next or previous glyph. Use NUMPAD 1-9 to move the glyph selector in any of the eight directions. Use NUMPAD 5 to toggle between the previously selected and currently selected glyph—very handy for creating designs that require continual switching between two characters. Use NUMPAD / and NUMPAD * to quickly select the blank or solid character glyph (erase and fill). All of these keyboard shortcuts can save valuable time versus having to continuously move the mouse back and forth to alter the glyph, depending on the project.
Character Set Summary
- 96 English Character Alphanumeric Set (A-Z, a-z, 0-9, Symbols)
- 16 Directional Glyphs and Arrows
- 16 Left-and-Right Facing Humanoid Figures (8 Upper and 8 Lower Halves)
- 8 Airplane, Space and General Shapes
- 16 Progressively Filled Horizontal/Vertical Gylphs
- 16 Sphere and Special Effect Glyphs
- 80 Bloxel, Shading and Piping Glyphs
- 8 Miscellaneous Glyphs including Empty and Full
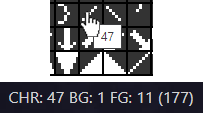 TIP: You can see what index a specific character maps to in Aquarius by hovering over the character with your mouse momentarily until a tooltip appears. This is valuable information for programming, as you can POKE the desired character onto the screen by knowing its index or PEEK a specific area of the screen to check for the existence of a specific character. The code generation feature of Aquarius Draw will automatically construct the necessary data for you, but knowing the indexes is important for programming your own dynamic elements. You can also hover your mouse over a placed tile in the canvas to see statistics at the top including the character ID, or right-click a tile to copy POKE data directly.
Character Preview
 The currently selected character is indicated by a red border surrounding it in the character selector. More prominently, the selected character appears in the enlarged preview below the selector—accurately reflecting the selected foreground color against the selected background color.
This live character preview gives you a magnified perspective of the selected configuration before you begin drawing. What you see in the preview box is what you will get when you click within a tile grid on the canvas.
 With Aquarius+ comes the new capability of swapping in custom character ROMs. These are binary 2048 byte files containing 256 character 8x8 glyphs. Character indexes 32-126 correspond to common ASCII values, so when editing or replacing character ROMs it is recommended to retain the alphanumeric arrangement in these indexes to continue supporting proper printed text strings and so on...depending on your app requirements of course.
The character editor is accessed through the right-click context menu of the character selector panel, which includes the following actions.
- Load Character ROM: Allows you to browse your computer for any compatible 2KB binary ROM file.
- Edit Character ROM: Opens the full-featured character glyph editor for advanced manipulation.
- Save Character ROM: Allows you to save the current character ROM in binary format to your computer.
- Default Character ROM: Reverts any changes and restores the default Aquarius character ROM.
NOTE: When using context menu to load a character ROM, you are only allowed to load binary data (.CHR, .BIN, .ROM) and it will override the entire existing character set. If you have a PNG-based character tilemap or specific glyphs you wish to swap in, you can do this from within the editor.
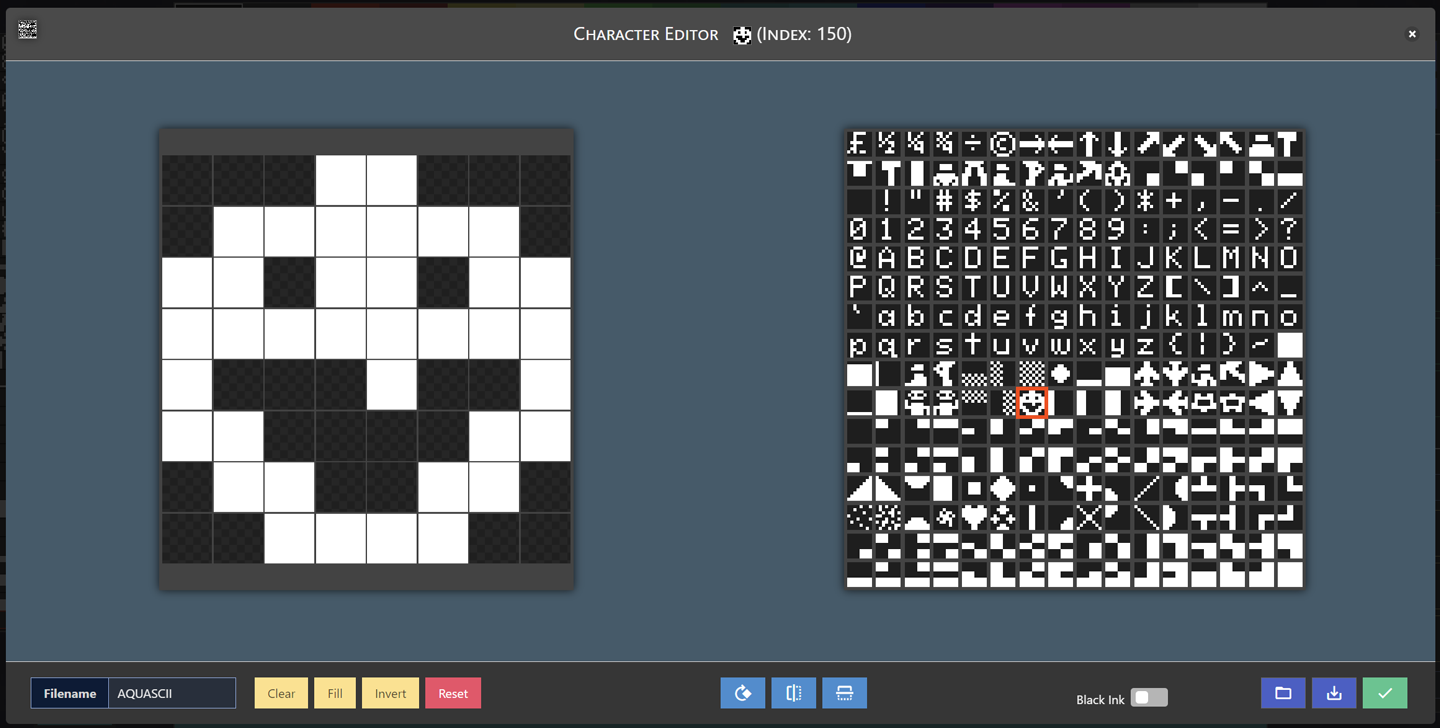
Editing Glyphs
Within the character editor, you will see an 8x8 editing grid on the left and the 256 character map to the right. The character map will always be arranged in the true indexed order (0-255). Whichever glyph was active in the main scene editor before entering the character editor will be selected, and clicking to any other will immediately update the editor and commit any changes to the prior glyph. Left-click on any cell in the 8x8 grid to set that cell as filled (ink) or empty (paper).
As you make changes within the character editor, they will be reflected within the character map and title bar preview automatically. You can hover over the top-left preview icon in the header to see the raw character map image, which you can then right-cick and save as a common PNG for use in external editors and development platforms. Likewise, if you want to save an individual 8x8 glyph, you can right-click the center preview image in the header and save as a PNG.
Beneath the 8x8 editor are a variety of actions:

- FILENAME — The name of the character ROM. This will be used as the default name when saving.
- CLEAR — Blanks out the current glyph, equivelent to a space or character 32/160.
- FILL — Fills in the current glyph, equivelent to a solid block or character 127/255.
- INVERT — Reverses the ink and paper, so filled in parts of the glyph will be cleared and vice versa.
- REVERT — Restores the selected glyph to its original state from when you first clicked it.
- ROTATE 90° — Transforms the glyph by rotating it 90 degrees clockwise with each click.
- MIRROR HORIZONTALLY — Flips the x-axis to create a horizontally mirrored glyph.
- MIRROR VERTICALLY — Flips the y-axis to create a vertically mirrored glyph.
- BLACK INK — Inverts the entire display so that ink appears black and paper appears white.
- LOAD CHARACTER ROM — Allows you to load external data into the character map.
- SAVE CHARACTER ROM — Generates a binary character ROM to save on your computer.
- CLOSE — Returns you to the main editor.
Rearranging and Cloning Glyphs
It is often useful to rearrange particular glyphs within the physical 256-indexed binary space, and to make copies of a glyph for additional alterations. A common use of cloning a glyph into additional indexes would be to create different angles of the character (easily done using the editor's rotate and mirror actions), similar to how the default character ROM includes four directions for the airplane character. Rearranging the characters is especially helpful when considering a programmatic means of interacting with them through code, but is also useful for means of grouping visually similar items to later work with in the editor.
SHIFT + LEFT-CLICK — Swaps the selected character glyph with the character over your mouse.
SHIFT + MIDDLE-CLICK — Clones the selected character glyph into the character over your mouse.
Any changes made to the order of the characters will affect existing characters in the scene and will be written as such within the character ROM, if you save out the modified character map. Also note that by default Aquarius Draw uses a "Sorted" view of the default characters, which you can revert to the original (ROM-indexed) layout from within the right-click context menu of the main character selector.
Loading PNG Tilemaps
 The load option within the character editor will allow you to replace the character map with any other character ROM, starting from the selected glyph, but has an added option of allowing PNG graphics as well. This makes it very convenient for importing particular 8x8 glyphs from an external source directly into whichever indicies you want. Aquarius Draw can import PNGs into glyphs if they have white ink on black background, any ink on transparent background (recommended), or black ink on white background if you toggle "black ink" mode before importing.
When importing PNGs that are larger than 8x8, such as a complete character map or other 8x8 arranged tileset, Aquarius Draw will import all of them starting from the selected glyph onward. If the end of the character map is reached and there are still more glyphs being processed from the PNG, it will wrap around to the top.
This feature can be particularly useful to quickly import custom fonts in place of the default ASCII style. For example, the website ZX Origins offers more than 400 8x8 fonts in a prepared format that includes PNG layouts in ASCII order. Within Aquarius, a user can click into index 32 (space) and then load one of the bitmap fonts to populate the entire ASCII table with ease. Using the resources from the above website, the arrangements may alter the "space (32)" and "solid (127)" gylphs. This is easily remedied by reselecting index 32 and clicking "clear" and then index 127 and clicking "fill" to restore those original glyphs, without affecting the rest of the loaded characters. Another potentially valuable font resource is at Atari8bit.net.
Just remember that loading larger images will be evenly chopped up into 8x8 glyphs, left-to-right and top-down starting from the currently selected character glyph in the editor. You can mix and match many PNG images in this way to create versitile character maps, as seen in teh image on the right that combines both a custom character set and 160 custom graphics from Kenney.
(Aquarius+ Update: Aquarius Draw has been updated to include a custom color picker for each of the 16 color indicies from 4,096 total colors. This is explained later in this section.)
The Aquarius color palette consists of 16 colors—8 primary tones and 8 lighter-or-darker variants. The colors in the editor are approximate representations and are derived from RGB averaging of a screenshot captured on the hardware itself. The names reflect what each color was described as in the Aquarius manual, even though most would agree that the "Orange" tone is more realistically a dark red, and so on.
- Default Foreground: Black (0)
- Default Background: Light Blue-Green (6)
- The Default Aquarius Color Combination Looks Like This
KEYBOARD SHORTCUT: Pressing F2 will invert the current background and foreground selection. A yellow-on-blue character will become a blue-on-yellow character, for example. This is very useful for certain design operations and tile manipulations. You can also RIGHT-CLICK on the character preview (or color selection) and select Swap Colors (Invert) from there.
| Index |
Swatch |
Name |
RGB |
HEX |
| 0 |
|
Black |
17, 17, 17 |
#111 |
| 1 |
|
Red |
255, 17, 17 |
#F11 |
| 2 |
|
Green |
17, 255, 17 |
#1F1 |
| 3 |
|
Yellow |
255, 255, 17 |
#FF1 |
| 4 |
|
Blue |
34, 34, 238 |
#22E |
| 5 |
|
Violet |
255, 17, 255 |
#F1F |
| 6 |
|
Light Blue-Green |
51, 204, 204 |
#3CC |
| 7 |
|
White |
255, 255, 255 |
#FFF |
| 8 |
|
Light Gray |
204, 204, 204 |
#CCC |
| 9 |
|
Blue-Green |
51, 187, 187 |
#3BB |
| 10 |
|
Magenta |
204, 34, 204 |
#C2C |
| 11 |
|
Dark Blue |
68, 17, 153 |
#419 |
| 12 |
|
Light Yellow |
255, 255, 119 |
#FF7 |
| 13 |
|
Light Green |
34, 221, 68 |
#2D4 |
| 14 |
|
Orange |
187, 34, 34 |
#B22 |
| 15 |
|
Dark Gray |
51, 51, 51 |
#333 |
Color Value Formula
 In Aquarius, each of the 256 background-foreground color combinations are computed into a single 0-255 integer to pass into the designated memory slot. Aquarius Draw will show you the final color value in the upper-left corner, when you hover your mouse over an existing tile on the map. Aquarius Draw also generates the necessary POKE/DATA commands for plotting the visuals onto the screen automatically.
To manually calculate the value for other programming or design uses, simply use the formula: (Foreground Index * 16) + (Background Index). For example, if you want to display GREEN (2) ON DARK-BLUE (11) you'd use (2 * 16) + (11) = 43. For more information on memory allocation in Aquarius for plotting characters, please refer to the Drawing Canvas section.
Custom Colors (Aquarius+)
With the Aquarius+ and plusBASIC, the 16 color indices can be individually customized fom 4,096 colors. In Aquarius Draw, you can right-click on any color from the color picker and select Custom Color Selector to alter its value. Once toggled, the character selector will be replaced with a full-range color picker. Hover your mouse over any color to immediately see the results on the canvas for any tiles that match that color.
 If you are satisfied with a particular tint while on the full-range color selector, left-click to immediately apply the change to the palette.
- If you want to revert the current color selection and close the custom color picker, click on the red [X] above the color selector.
- To restore the native Aquarius color for a particular color index, right-click on the desired color and select Reset Color.
- For manual input of a custom color or advanced selection options, left-click onto the color preview that appears above the custom selector.
- When using the advanced color selector, click on the green [✔] to commit the change.
- To restore the original color palette for all 16 indices, right-click on the main color picker and select Default Color Palette.
- To generate boilerplate plusBASIC code to alter the default palette, right-click on the main color picker and select Copy Palette Data.
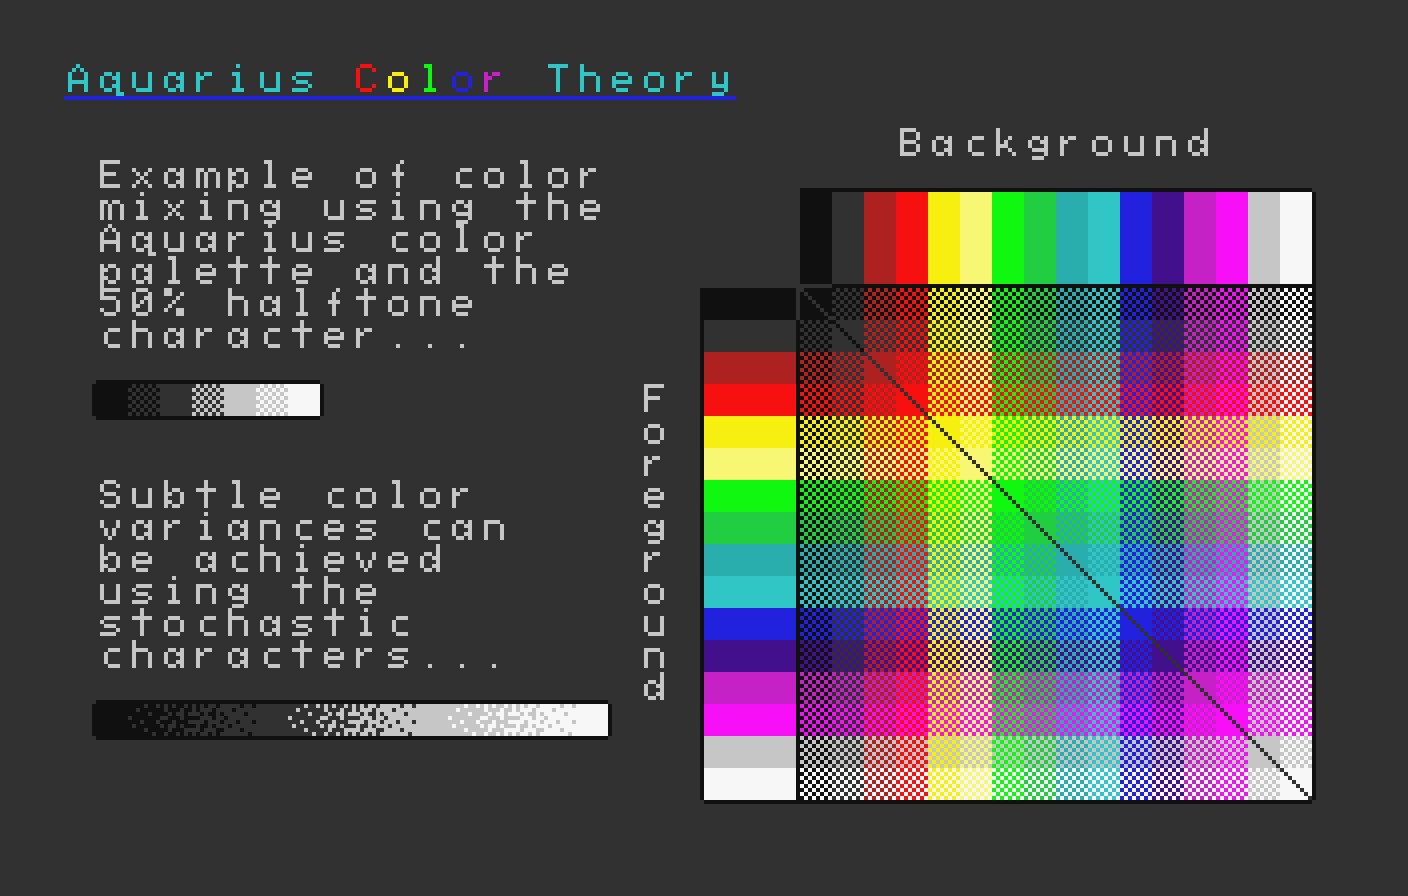
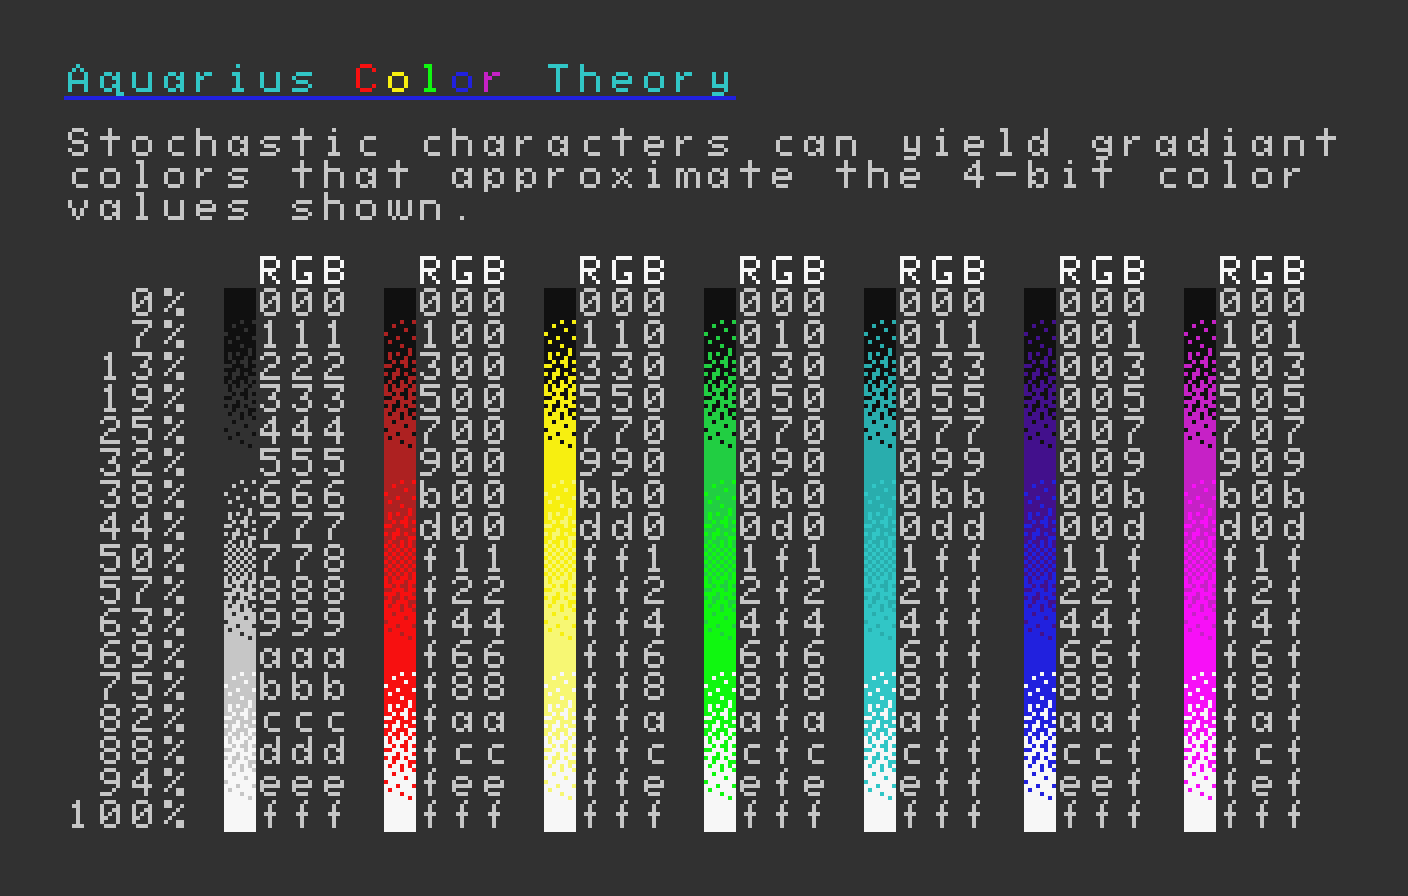
Aquarius Color Theory
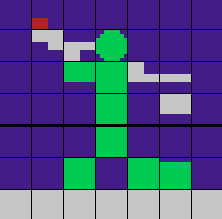
Community member Sean Harrington created the helpful graphics below to best illustrate the color theory of Aquarius, including some neat tricks to stretch the color limitations to their full potential by combining specific foregrounds, backgrounds and characters to achieve dithering and blending. These graphics are also available from the "Templates" dropdown of Aquarius Draw, so you can experiment or generate the code for them to preview on real devices or emulators.
Custom Color Selection (Aquarius+ Compatible)
With the introduction of Aquarius+ and plusBASIC, the color palette can now support four different palettes defined from a bank of 4,096 colors. Each of the 16 color indices can be personalized as follows:
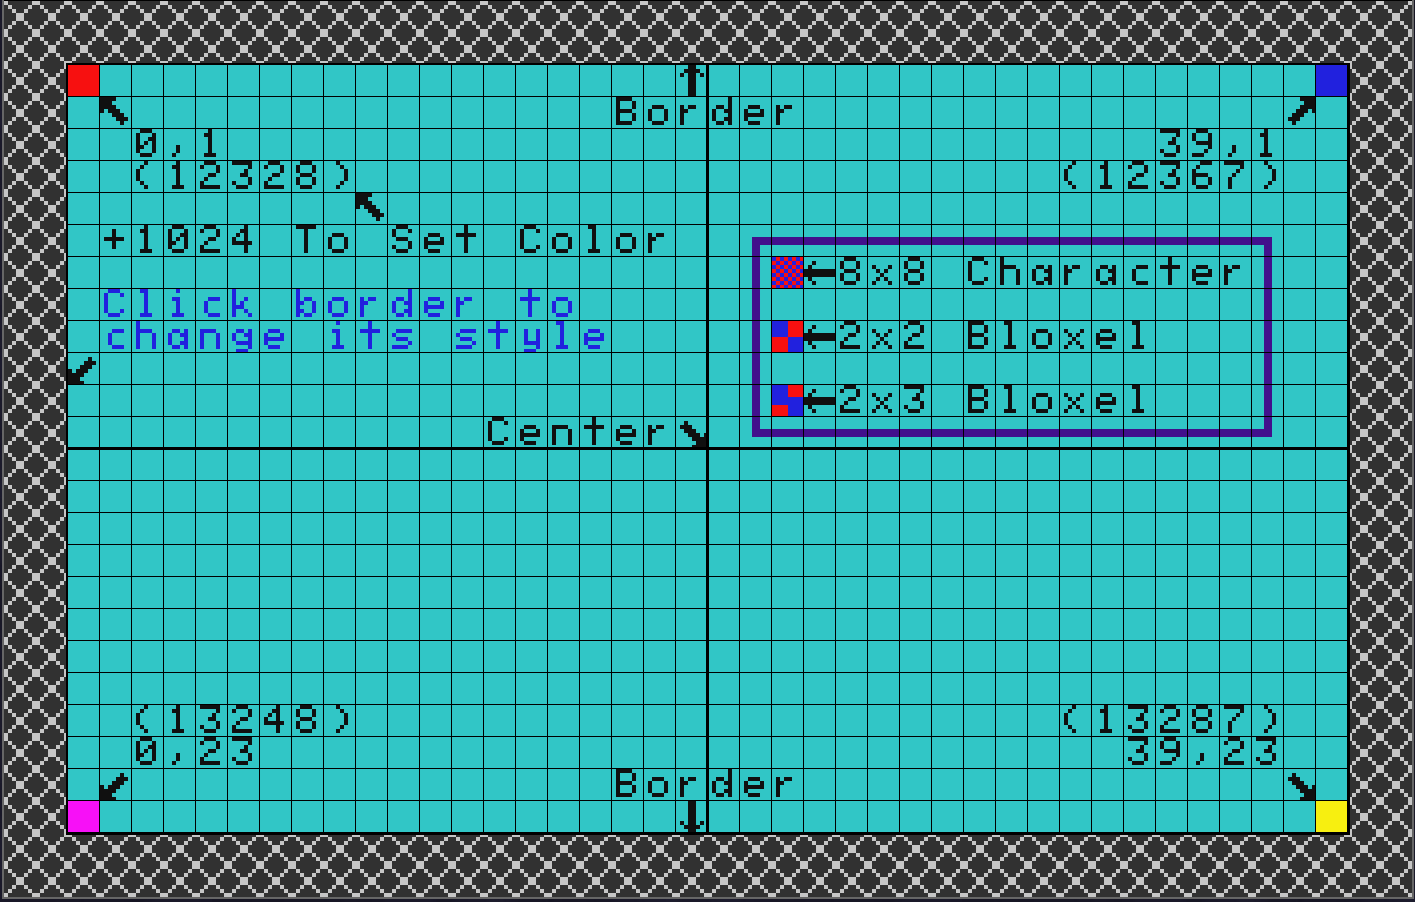
Simplified Tile Area: 40x24 (Default View)
Official literature for Aquarius explains that it has a 40x24 directly-editable screen area, as well as an outer border (typically two tiles thick, contained within the usually unpredictable overscan area of CRTs). Each tile can contain one of the 256 character glyphs and a two-tone color derived from the selected background and foreground colors. The individual grid tiles are 8x8 in pixel resolution. This provides a technical visual resolution of 320x192, but only across the 40x24 tiles with the preexisting character set. You cannot plot pixel-by-pixel graphics, but there are 2x2 and 2x3 bloxels (pseudo-pixels) that can assist as described later.
In this simplified arrangement, the top-left tile is actually (0, 1) and resides at memory address 12328. The border can be adjusted by clicking anywhere within it and it'll adjust to your currently set color and character combination. If you generate the actual code, you'll note that a third row is drawn at the top to match the border, that is because Aquarius has a hidden row at the top that can't be directly printed to from BASIC.
Complete Tile Area: 40x25 (Secret Row 0)
 For simplicity, Aquarius Draw defaults to the officially documented grid explained above, as well as a user-definable border. However, there actually exists a secret 25th row of tiles between the top border and the (0, 1) base row, creating a 40x25 design space. This 0th-row allocation is not directly accessible via PRINT but can be tapped into using POKE and PEEK.
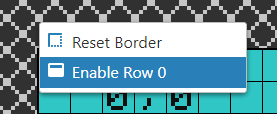
To unlock the full user-customizable screen space within Aquarius Draw, simply right-click on the border and select "Enable Row 0." This will add a new row to the top of the grid. This provides a technical visual resolution of 320x200 and will allow you to personalize that extra area to your liking. To return to the default 40x24 view, you can right-click the border and select "Disable Row 0." Whatever you set this value to will preserve the next time you open the utility, since power users may always prefer to use 40x25 as the default.
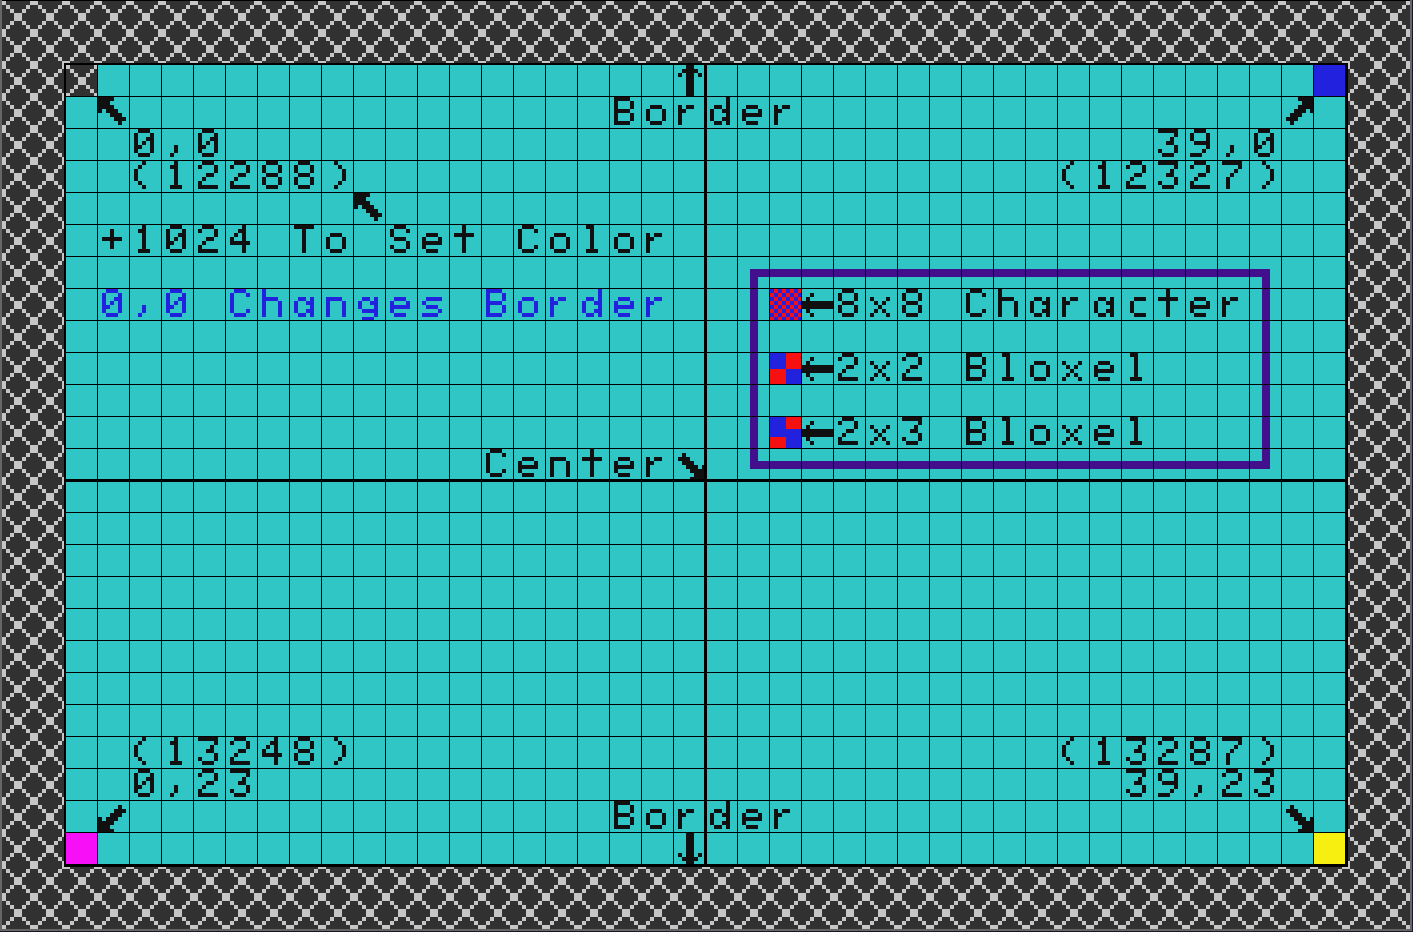
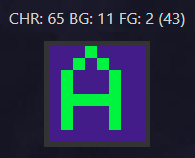
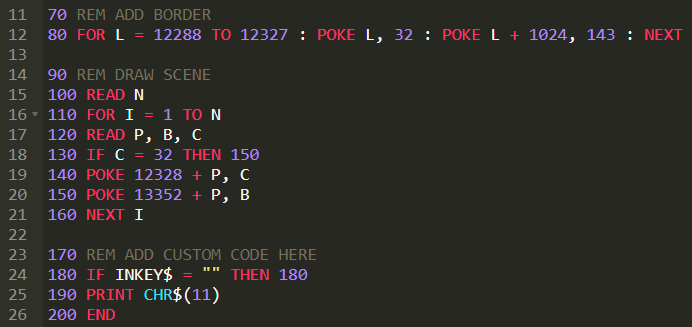
With the secret row 0 enabled (character memory allocations of 12288-12327 and color allocations of 13312-13351), the first tile at (0, 0) is a special location that also changes the entire border. Keep this in mind when designing with row 0 enabled. The remaining 39 column tiles in the secret row can be altered as usual. Any character or color data that you POKE to 12228 (and 13312) in BASIC will immediately apply to the entire border. Unlike POKING the rest of the tiles in BASIC, which is a slow operation, modifying this particular tile is programatically fast with no performance setback. It can be used for creative special effects, without any performance penalty.
Memory Allocation
Within the Aquarius visual memory map, the character allocation from (0, 0) "Home Column" to (39, 23) "Last Column" runs from 12328—13287. This means that if you enter: POKE 12328, 65 : POKE 13287, 90 the letter "A" will appear at the top-left, and "Z" at the bottom-right. To traverse a given row, you can add or subtract 1 from the base memory location. To traverse a given column, you can add or subtract 40 from the base memory location.
Conveniently, the color allocation is situated at +1024 from the character allocation, making the color memory range span 13352—14311. Using the example above, if you enter: POKE 13352, 20 : POKE 13287, 65 then the top-left tile will be filled Red on Blue, and the bottom-right tile will be filled Blue on Red.
Customizable Border
 An outer border exists within the Aquarius hardware that repeats a specific character/color pattern from the edge of the user-accessible canvas outward, indefinitely. This area is best thought of as the "overscan" region, where certain monitors/TVs may obscure some or all of it. By default, this border is Light Blue Green to match the rest of the screen.
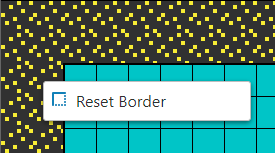
In Aquarius Draw, you can personalize the style of this border by LEFT-CLICKING anywhere on it after selecting your desired character/color combination. If you wish to revert it back to the default style, you can RIGHT-CLICK on the border and select Reset Border.
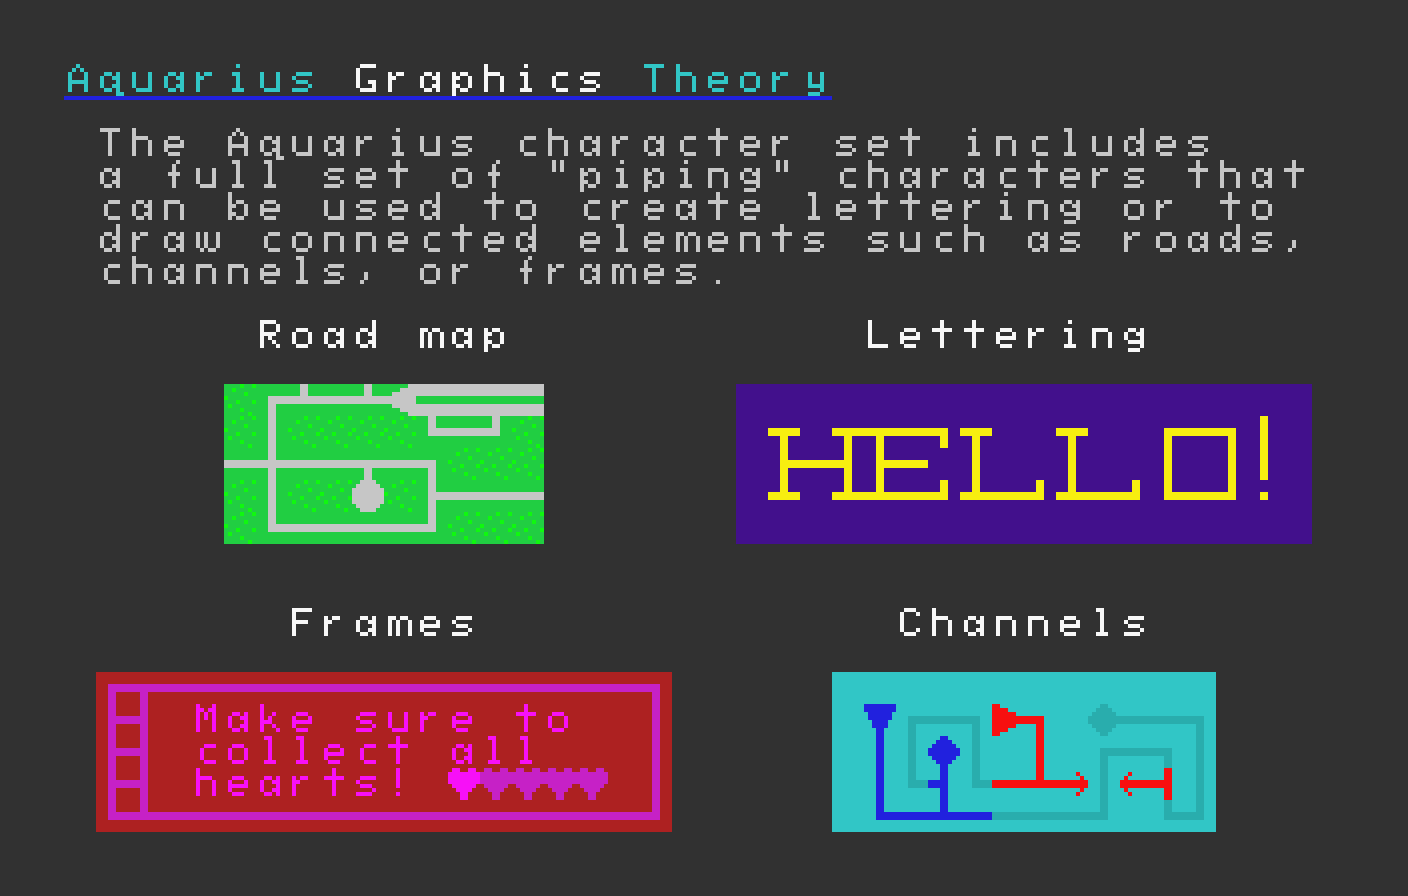
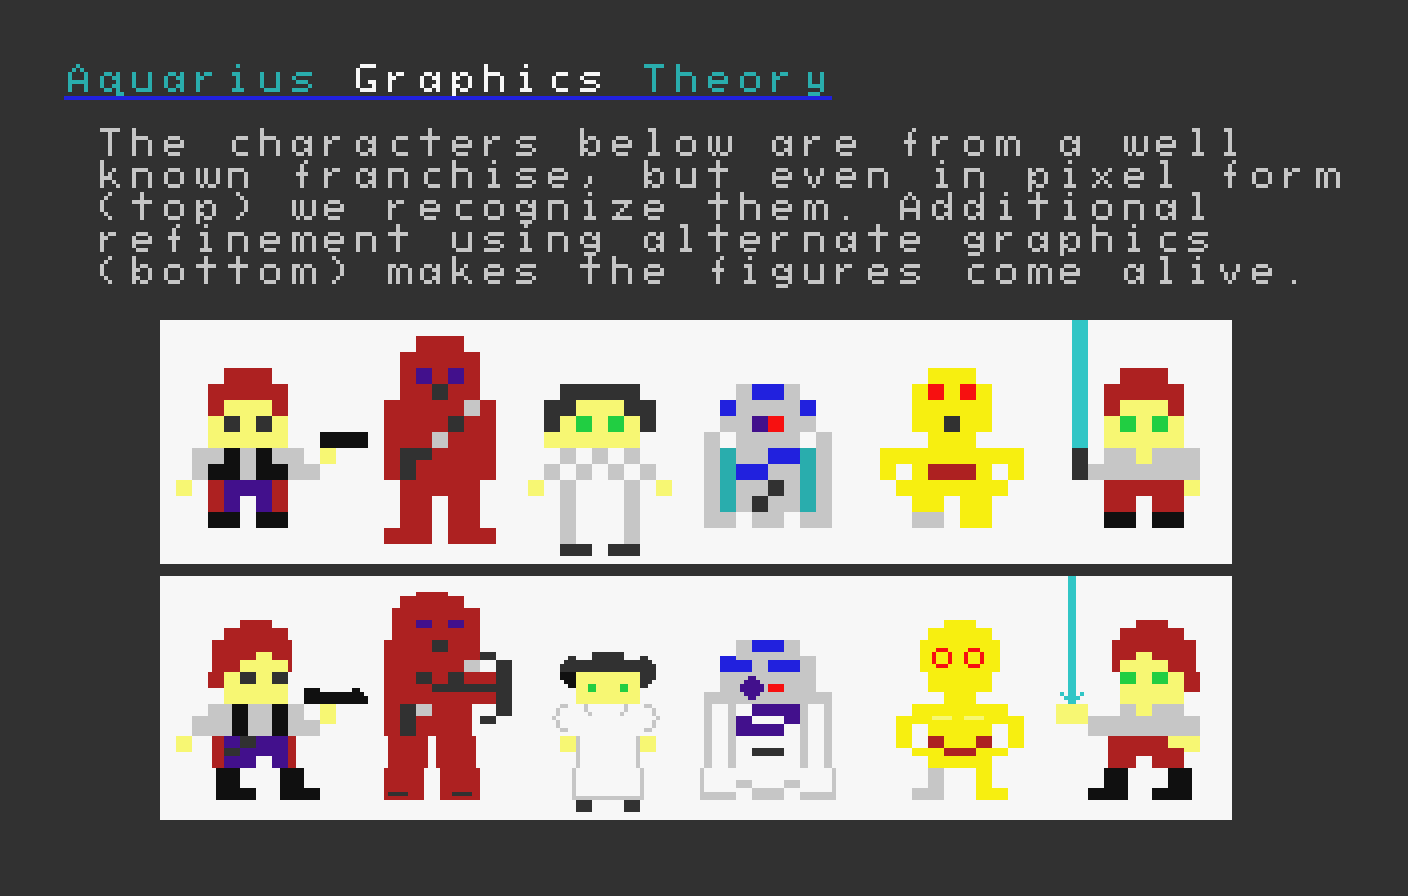
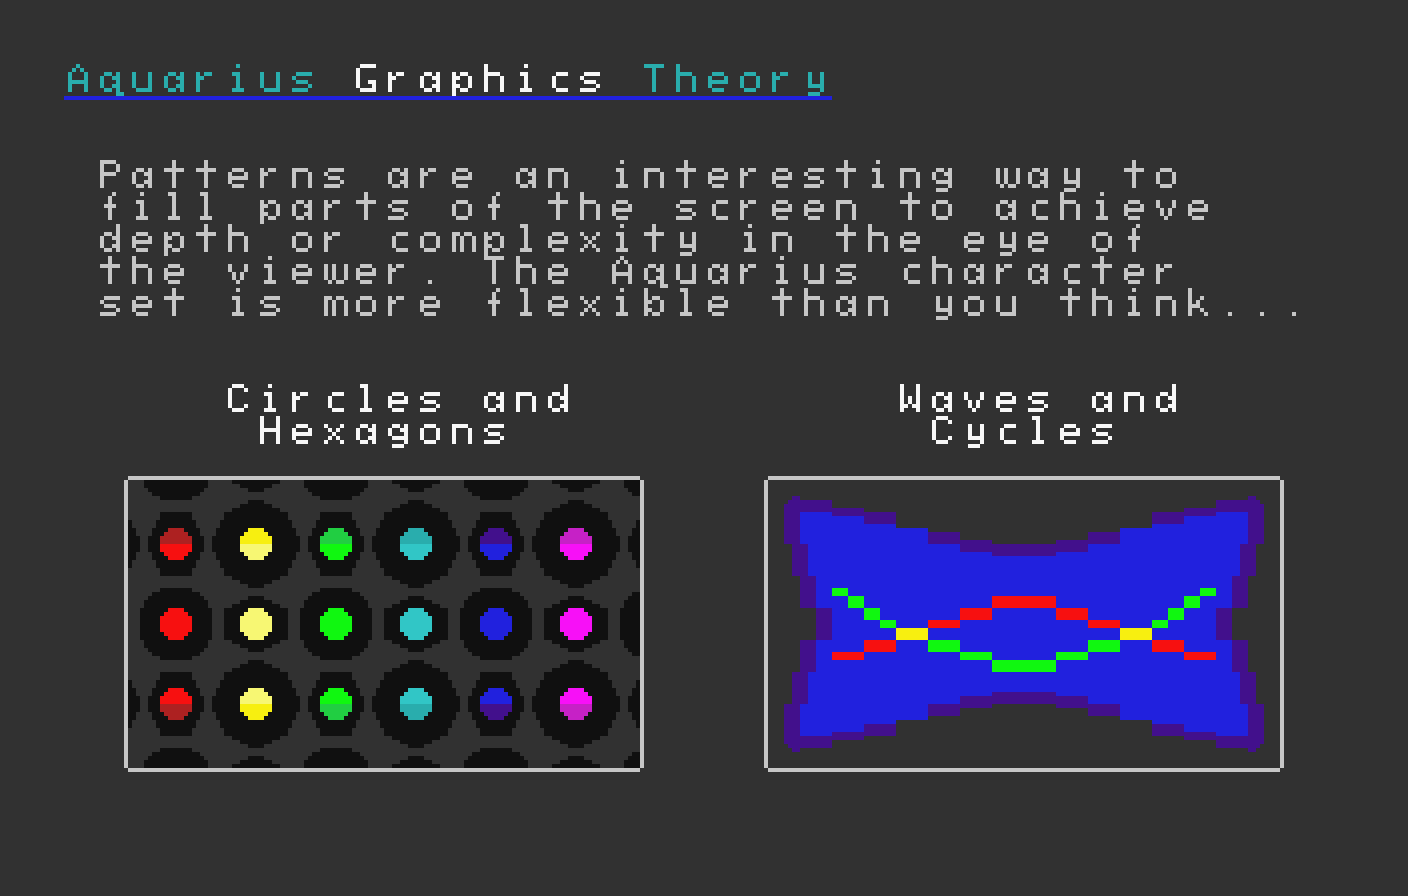
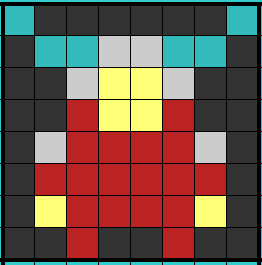
Aquarius Graphic Theory
The illustrations below by Sean Harrington help illustrate some useful Aquarius graphic theory concepts. These scenes are also available from within Aquarius Draw as "templates" and can be loaded to review how these effects were achieved. For advanced drawing effects and functionality, please refer to the Bloxel Drawing section.
Using Aquarius Draw is meant to be fun, intuitive and very familiar to anyone who has ever used a drawing application. Although the majority of features are available easily from the menu, advanced users will appreciate some added convenience methods and functionality via keyboard shortcuts and context menus. This section will briefly cover the general use of the application, component-by-component.
Character Selector
 The character selector is described at length in the Character Set section of this guide. Simply LEFT-CLICK on any character you wish to select, and a red border will appear around it (as well as a large preview beneath it). You can hover over any character momentarily to view the character code for programming uses, or rearrange the character set by RIGHT-CLICKING anywhere within it and selecting the Sorted or Original order.
- LEFT-CLICK — Select Character over Mouse Cursor
- RIGHT-CLICK — Select SORTED or ORIGINAL Character Order (Context-Menu)
- HOVER — Display Current Character Index
- NUMPAD / — Select EMPTY Character (32 - e.g., Eraser)
- NUMPAD * — Select SOLID Character (255 - e.g., Fill)
- NUMPAD + — Traverse to NEXT Character
- NUMPAD - — Traverse to PREVIOUS Character
- NUMPAD 5 — Swap Between LAST and CURRENT Characters
- NUMPAD 1-2-3-4-6-7-8-9 — Traverse Character Set in Eight Directions
Color Selector
The color selector is described at length in the Color Palette section of this guide. There are two rows of colors: Top=Foreground and Bottom=Background. Simply LEFT-CLICK on your desired background and foreground colors. A white border will appear around the selected colors, and these will also be reflected in the character preview. You can hover over any color momentarily to view the color code for programming uses. To invert the colors, you can RIGHT-CLICK anywhere within the color selector and select and selecting Swap Colors (Invert).
- LEFT-CLICK — Select Foreground (Top) or Background (Bottom) Color at Mouse Cursor
- RIGHT-CLICK — Invert Colors (Context-Menu)
- HOVER — Display Current Color Index
- F2 — Invert Colors
Main Canvas
 The drawing canvas is described at length in the Drawing Canvas section of this guide. This is the heart of Aquarius Draw and where you will spend most of your time. After selecting your desired character and color combination (the "brush"), simply hold down LEFT-CLICK and move your mouse around the grids to paint them in. When you are finished drawing a particular stroke, release the mouse to move the cursor to a new location or change the brush.
You can also MIDDLE-CLICK any tile on the canvas to capture that tile for immediate use, akin to an Eye Dropper tool in other applications. At any point while drawing, you can press F2 to invert the colors, or use the NUMBER PAD to traverse the character set without having to continuously move your mouse back and forth (see Character Selector section for details).

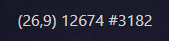 As you move your mouse cursor around the canvas area, a variety of tile statistics will be displayed in the upper corners of the interface. The Top-Left Statistics include the Character ID, Background Color ID, Foreground Color ID and Computed Color ID. The Top-Right Statistics include the Column Number, Row Number and Computed Character Memory Location as both decimal and hex. For more details on memory allocations, please refer to the previous Drawing Canvas section. These statistics are especially useful for development purposes.
Tile Inspector
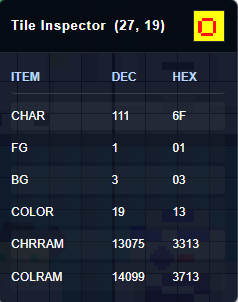
Additional tile specifics can be reviewed by opening the Tile Inspector (CTRL+I). When open, any tile on the grid that you hover your mouse over will display in Decimal and Hexidecimal:
- Character Index
- Foreground Color Index
- Background Color Index
- Computed Color Value
- Character RAM Memory Location
- Color RAM Memory Location
Clicking any of the values will copy them to your clipboard. (To prevent the tile changing as you move your mouse, you can right-click on the tile to open the context menu and then move your mouse to the inspector to copy any necessary values.)
Fast Fill
A convenient feature of Aquarius Draw is the ability to fast-fill any given row or column that your mouse is hovering over. To fill all Empty Spaces between your mouse and the next filled tile, hold in the ARROW KEY that corresponds to the direction you wish the fill to travel. With your mouse in position of the starting point you wish to begin the fill from, LEFT-CLICK and all of the empty tiles will immediately fill. As soon as a filled in tile is reached, the operation concludes.
If you prefer to fill All Spaces between your mouse and the edge of the canvas (overwriting ones already filled in), simply hold in SHIFT + ARROW KEY in the direction you wish the fill to travel, and then LEFT-CLICK to fill as before.
Column Shift
It is also possible in Aquarius Draw to shift columns and rows, which has some specialized use cases. Most commonly, this can be valuable for centering or offsetting components. To shift a particular row or column, press CTRL + ARROW KEY in the direction you wish to shift the tiles. Each time you tap the arrow key, the row or column your mouse is over will shift by one unit, with the outer-most tiles wrapping to the opposite side of the screen.
NOTE: This operation affects all tiles, whether or not they are filled in. For more granular control over selection and repositioning, consider the Select Tool instead.
Select Mode
 An option exists in Aquarius Draw that allows you to highlight an existing range of tiles, then Cut or Copy them to a new location. This is an excellent method for quickly cloning complex design elements into other areas of the screen, or for finer positioning after placement. To toggle Select Mode press F4 or click on the Toggle Select Mode icon on the right-menu.
With Select Mode enabled, you can LEFT-CLICK AND DRAG from top-left to bottom-right of the tile range you wish to add to the selection. After you release the mouse button, you can move your cursor around the screen and a placement grid will follow it to indicate which tiles will be affected when you paste. To paste a copy of the selection, you can press MIDDLE-CLICK or CTRL + V on the keyboard. This can be repeated as many times as you wish, until you make a new selection or disable the tool. To instead Cut the selection, press CTRL + X, you can then Paste it as described previously.
It is also possible to copy an element from one instance of Aquarius Draw to another. To do so, highlight the cells you wish to copy as described previously and then press CTRL + C (or select "Copy Aquarius Tile Data to Clipboard" from the right-click context menu). After the data has been copied, switch to the destination instance of Aquarius Draw and press CTRL + V once to display the selection, and a second time or MIDDLE-CLICK to paste the instance from the location of your cursor. You can paste the copied object repeatedly, but only until you click into a tile or change the selection.
NOTE: If you utilize the Cut operation, the character data in the original selection will be replaced with the empty character (32) and the foreground/background will be filled in with the most commonly used in the scene. This may have undesirable results depending on the scene, so in many cases you may find it more suitable to simply copy the item and then manually overwrite the original tile-by-tile, as desired.
Keyboard Data Entry
It is easy to add text into the scene without having to manually select each individual glyph from the character selector. This is helpful when creating titles, credits or instructional-based scenes. To set the starting point, LEFT-CLICK on the desired canvas tile. You can then immediately begin typing on the keyboard from that location including capitalization, punctuation, numbers and line breaks. I recommend typing slowly and one character at a time to alleviate double-keystrokes, but if you make a mistake you can simply backspace and continue.
NOTE: If you initially set the start point by placing an alphanumeric character with the mouse, the first character you type on the keyboard will appear to the right of that character. Conversely, if you place a graphical glyph with the mouse as the starting point, the first character typed will replace that symbol.
POKE Data
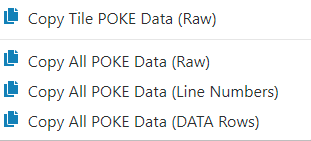 The context menu accessible from the canvas via RIGHT-CLICK includes several different options for copying POKE data directly, without having to go through the full code generation process. This is useful if you are using Aquarius Draw to create isolated objects for a larger project you are working on, in which case you can simply copy the tile data for pasting into your existing source code. I recommend using the Generate Code option if constructing complex scenes You may also exit bloxel mode at any time by pressing ESC.
If you are in Select Mode, the "Copy All" options will generate the data only for the tiles contained in the selection. This can prove very helpful if you have a scene containing numerous game objects, and want to copy only particular ones into your custom code at a time. Otherwise, the "Copy All" options will generate the code for every tile in the scene that has been visibly altered. (To generate machine language code or advanced BASIC operations, please use the Generate Code option instead.)
- Copy Tile POKE Data (Raw) — Copies the POKE Data for the Tile at Mouse Cursor to Clipboard
- Copy All POKE Data (Raw) — Copies the POKE Data for Every Altered Tile
- Copy All POKE Data (Line Numbers) — Copies the POKE data for Every Altered Tile and Prepends Line Numbers
- Copy All POKE Data (DATA Rows) — Copies the POKE for Every Altered Tile and Constructs a Loader via DATA (More Concise and Adaptable)
Canvas Commands and Shortcuts
Since the canvas is the central part of this application, all keyboard shortcuts described elsewhere in this manual are likewise applicable. Press F1 in the application to view a quick shortcut panel, which also contains a link to this full guide and the gallery.

- LEFT-CLICK — Draw Selected Character to Tile at Mouse Cursor
- MIDDLE-CLICK — Eye-Dropper (Set Character/Colors to Match Tile at Mouse Cursor)
- RIGHT-CLICK — Generate POKE Data Code (Context-Menu)
- HOVER — Display Statistics about Tile at Mouse Cursor (Top Corners of Interface)
- F1 — Toggle Keyboard Shortcut Cheat Sheet
- F2 — Invert Selected Colors
- F3 — Toggle Grid Overlay
- F4 — Toggle Selection Mode for Copy/Paste Features
- F5 — Generate Preview (Save as PNG or Upload to Gallery)
- F9 — Quick Export to Gallery
- F12 — Quick Export to PNG
- CTRL + I — Toggle Tile Inspector
- CTRL + M — Save Screen Memory Dump
- CTRL + Z / CTRL + Y — Undo / Redo (25 Levels)
File Menu
There are six action buttons on the file menu. The most prominent three including Toggle Grid grid_on (F3), Selection Mode highlight_alt (F4) and Generate Preview photo_camera (F5). For additional details about the Generate Preview option, please refer to the Image Output section of this guide.
| Item |
Icon |
Description |
Shortcut |
| Toggle Grid |
grid_on |
Enables or disables the grid overlay that separates each tile on the canvas. |
F3 |
| Select Mode |
highlight_alt |
Toggles selection mode for copy/paste functionality. |
F4 |
| Generate Preview |
photo_camera |
Launches the image output window to preview, export or upload the artwork as an image. |
F5 |
| Paint Background |
format_color_fill |
When disabled, drawing to the canvas will preserve the tile's existing background color. |
N/A |
| Paint Foreground |
border_color |
When disabled, drawing to the canvas will preserve the tile's existing foreground color. |
N/A |
| Paint Character |
format_color_text |
If disabled, drawing to the canvas will preserve the tile's existing character. |
N/A |
The latter three "Paint" buttons are for specialized use cases and rarely will need to be changed from their initial state. These three items assist in cases where you wish to update the properties of an existing tile without replacing it entirely. For example, if you want to recolor a variety of existing tiles without affecting the background or character glyph, you can disable "Paint Character" and disable "Paint Background" then paint over the desired tiles using a new foreground color. This will only update the foreground, while leaving leave the background and character untouched.
Similarly, there are five buttons under "Operations" including:
- RESET CANVAS — Erases the existing canvas (hold SHIFT to preserve your current character/color selection)
- FILL CANVAS — Fills each tile on the canvas with the selected character/color combination.
- FILL BACKGROUND — Fills each tile on the canvas with the selected background, preserving the existing foreground and characters.
- FILL FOREGROUND — Fills each tile on the canvas with the selected foreground, preserving the existing background and characters.
- FILL CHARACTERS — Fills each tile on the canvas with the selected character, preserving the existing foreground and background.
The final section of the main menu is the "Input/Output" section, including:
- FILENAME — A textfield for entering a filename before saving (if none is entered, a timestamp will be used instead).
- SAVE SCENE — Exports the current scene to an Aquarius Draw compatible JSON file.
- LOAD SCENE — Imports a compatible JSON file for editing.
- GENERATE CODE — Launches the code generation view for Aquarius-compatible source code; see the Code Generation section for more information.
- TEMPLATES — A selection of predesigned templates and examples that you can load into the editor for review or modification.
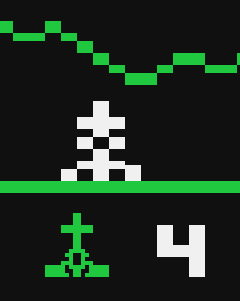
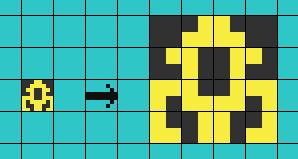
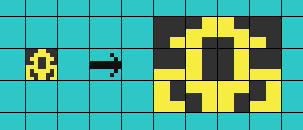
Unlike many home computers of the 1980s, Aquarius does not support customizable character sets or pixel-precise draw operations. Included in the character set are a range of bloxels and piping characters to accommodate a variety of advanced draw operations. Bloxels effectively convert each tile into a 2x2 or 2x3 grid with each cell either filled or empty. The Aquarius port of Astrosmash makes heavy use of these bloxel designs to display a custom and enlarged UI and game elements.
Aquarius Draw includes full freehand draw support for 2x2 and 2x3 bloxels, as well as the ability to import existing images and convert them to Aquarius-compatible bloxels. It is important to understand that even with bloxel drawing, each of the original 40x24 tiles can still contain only a single background and foreground color. You cannot adjust colors on a per-bloxel level, only per-tile.
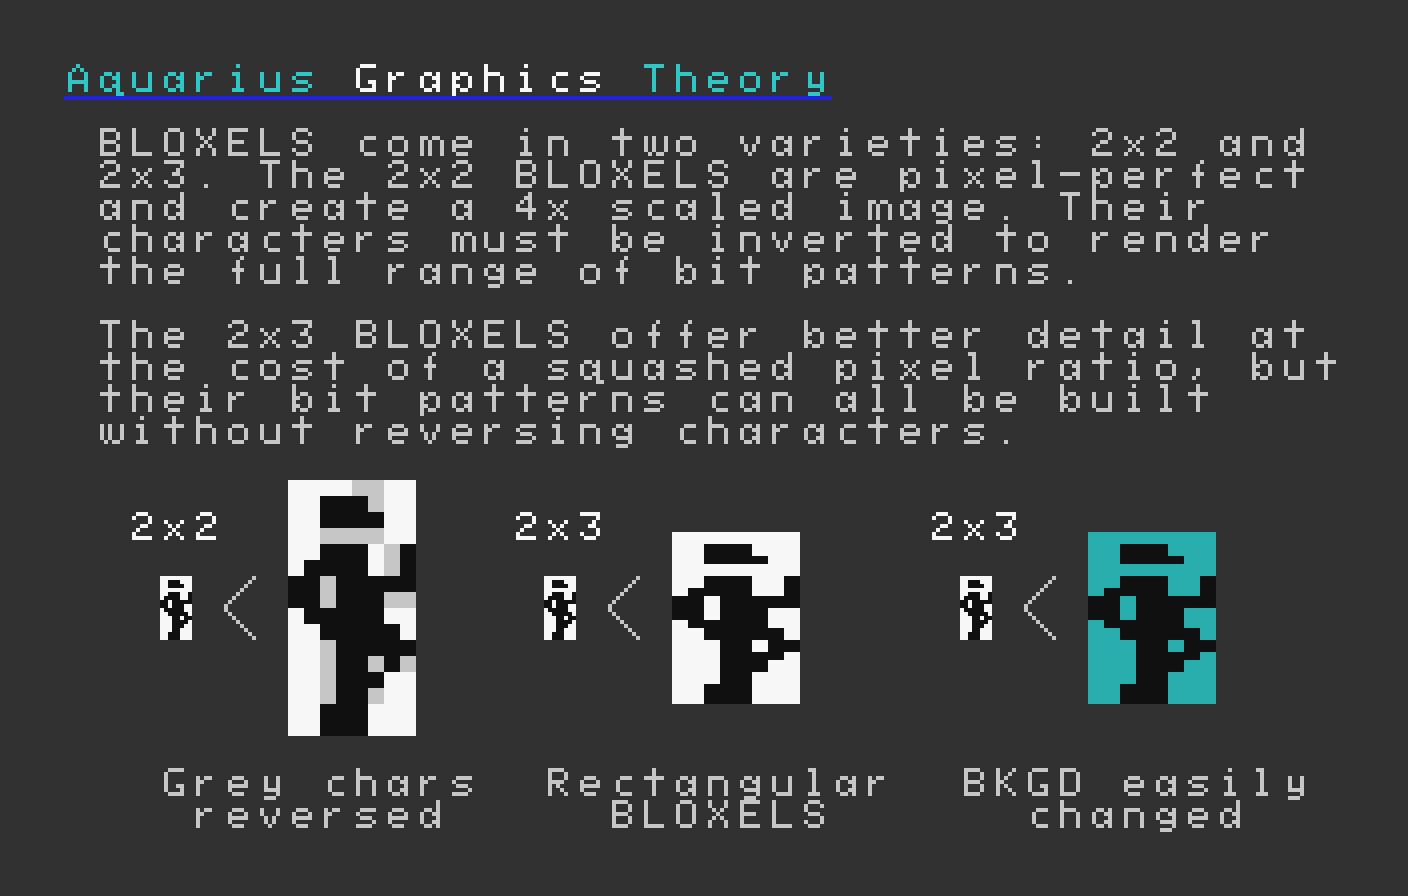
2x2 Bloxels
With 2x2 bloxels, an individual tile space gets divided into four quadrants giving the canvas an effective bloxel resolution of 80x48. Each of these sub-cells can be either filled in or left blank. This allows perfect reproduction of any of the existing character glyphs at four times the resolution. Unfortunately, in order to recreate all 16 possible 2x2 combinations of shading in a 2x2 bloxel, certain arrangements require inverting the foreground and background color. Aquarius Draw does this automatically when placing down 2x2 enlarged glyphs, but if you plan to animate the graphic or perform advanced operations this can complicate the process.
2x3 Bloxels
A complete set of 2x3 bloxel glyphs are included in the Aquarius character set. This approach sub-divides each tile into two columns and three rows, giving the canvas an effective bloxel resolution of 80x72. Each of these 2x3 sub-sections can be filled or left empty. A significant benefit of using 2x3 glyphs for bloxel design is that they adhere to the selected background and foreground colors. This means that after designing a scene using 2x3 bloxels, you can easily alter their background or foreground colors without any fuss; an easy way to do this in Aquarius Draw is to deactivate the "Background" and "Character" buttons on the right-menu, then simply paint over the bloxels with new foreground colors (similar if wishing to change the background). One potential disadvantage with the 2x3 bloxels is that it is not a square aspect ratio, so the middle row is shorter than the top and bottom rows and recreation of existing glyphs with it will result in a somewhat skewed appearance.
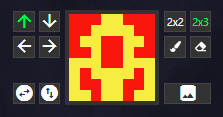
Activating Bloxel Mode
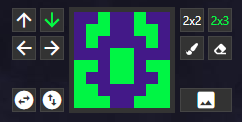
To enable or disable bloxel mode, simply press F9 or LEFT-CLICK on the large character preview box. When bloxel mode is enabled, you will see a number of additional buttons to the left and right of the character preview window. These options allow you to rotate the selected gylph (in enlarged bloxel format) in four directions, mirror it horizontally or vertically, toggle between 2x2 or 2x3 bloxel modes, as well as activate free draw/erase mode for creating unique non-glyph based designs. Additionally, an image upload button exists that allows you to import any graphic and the program will create a rough bloxel version from it, using your selected foreground and background color. You may also exit bloxel mode at any time by pressing ESC.
| Item |
Icon |
Description |
Shortcut |
| Rotate Glyph |
arrow_upwardarrow_downwardarrow_forwardarrow_back |
Rotates the selected glyph by 90 degrees either up, left, right or down. |
N/A |
| Mirror Glyph |
swap_horizontal_circleswap_vertical_circle |
Mirrors the selected glyph horizontally, vertically or both (can be combined with rotation). |
N/A |
| Bloxel Mode |
2x2 - 2x3 |
Designates whether the draw mode for placing glyphs or freehand should be in 2x2 or 2x3 format. |
N/A |
| Freehand Draw |
|
Allows you to freely draw around the canvas in either 2x2 or 2x3 modes. |
NUM * |
| Freehand Erase |
|
Allows you to freely erase existing bloxels on the canvas in either 2x2 or 2x3 modes. |
NUM / |
| Import Image |
insert_photo |
Allows you to import any image and convert it into an Aquarius-compatible bloxel design. |
N/A |
Image Importing
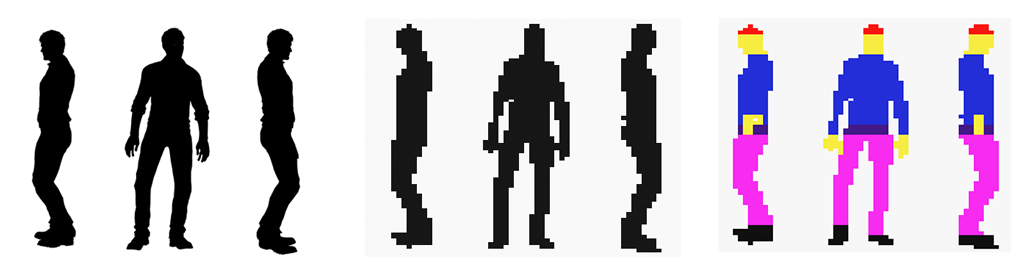
This feature offers a rudimentary but helpful method for importing existing graphics and automatically generating 2x2 or 2x3 bloxel designs. It does not pay attention to the colors, but will use yours elected foreground and background colors on import. This is why it is recommended to import at 2x3 resolution. Not only will you get a higher fidelity output, but you can then paint over the foreground using the tools available to quickly bring new colors to it.
You can use transparent PNGs in which case any pixel that is more than 50% opaque will get drawn. You can also use solid images of any format (BMP, GIF, PNG, JPG, WEBP) and it will be assessed based on grayscale value, where any pixel that is more than 50% white will be drawn. The images get scaled down to 80x72 (2x3 bloxel mode) or 80x48 (2x2 bloxel mode) prior to analysis, so if you design your base image at this resolution the end result may be more predictable and precise. Afer importing, you can easily enhance the details using the existing character glyphs in areas where those can benefit better than the basic bloxels.
To import an image, you may perform any of the following steps:
- Drag-and-drop the image from your computer to the large character preview (this will create a 2x3 bloxel import)
- Drag-and-drop the image from your computer to the 2x2 or 2x3 buttons (this will create either a 2x2 or 2x3 bloxel import)
- Click on the Import Image button and browse to the image (this will create either a 2x2 or 2x3 bloxel import)
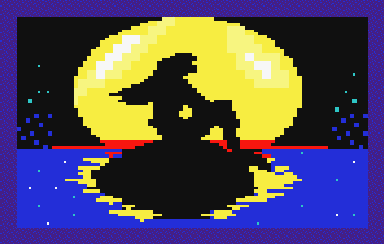
You can find thousands of free images online to experiment with, such as the excellent Pixabay.com. You'll find the most success with silhouette type images that do not contain too much detail or narrow strokes.
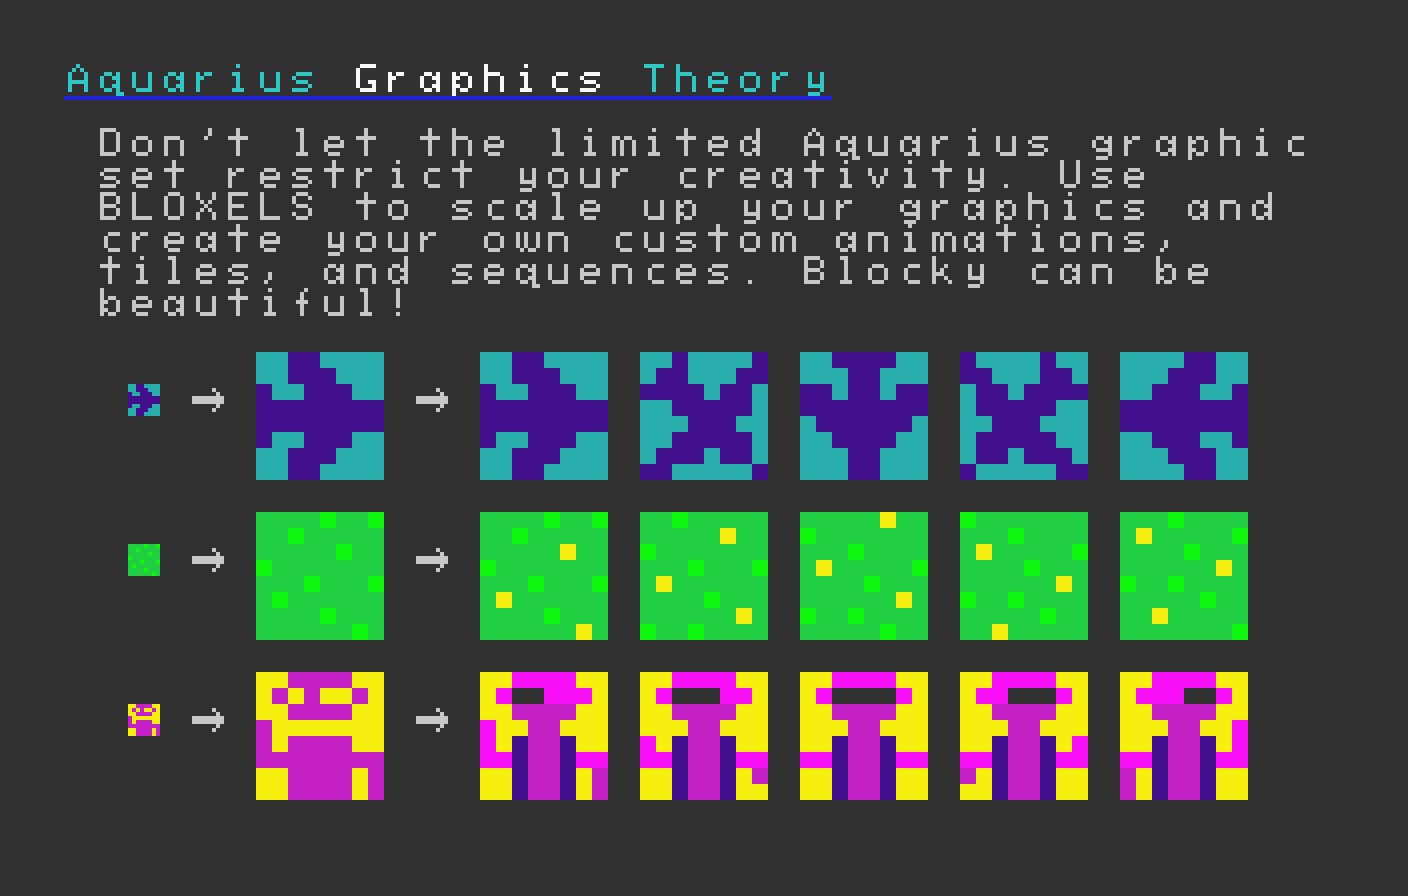
Bloxel Graphics Theory
Again with many thanks to Sean Harrington, below are some in-app demonstrations of bloxel theory. These are available as templates and can be loaded for additional analysis.

Aquarius+, in conjunction with plusBASIC, now support sprite mode capabilities. For programming details and specifications, please refer to the plusBASIC Reference Guide.
Aquarius Draw can facilitate designing and importing sprite graphics in order to generate the necessary byte code expected from plusBASIC. It can also be useful to see how particular images may look using the default color palette, or for selecting custom colors to ultimately generate a unique Aquarius+ compatible palette.
To enter sprite grid mode, right-click on the blank border surrounding the main grid and select 8x8 Grid (Sprite Mode). This will convert the grid view to a series of 8x8 sections to correlate with the individual 8x8 sprite tile specs of Aquarius+. It is possible to combine many 8x8 tiles into a single sprite from plusBASIC, and Aquarius Draw can generate the raw byte data needed for each of these tiles.
-
 Use the Solid Character Glyph #127 to paint the blank spaces within an 8x8 area.
- Use the Top Color Row (Foreground) to change the sprite colors while painting.
- WARNING: Color index 0 (black) will act as transparency when painted to the screen.
- Any empty pixels (those filled with Empty Character Glyph #32) will indicate transparency.
- You can use common editor techniques like middle-click for eyedropper, selection tools etc.
Right-click on any 8x8 quadrant to see additional sprite commands. From here, you can load any image into an 8x8, 16x16 or 24x24 space. The images will stretch to fit the designated space, while retaining its aspect ratio. If you enable "Override Palette with Sprite Colors" before loading an image, the most frequently used colors from the loaded image (up to 16 of them) will update the color palette automatically. It is recommended to keep the color count of external images down to 14 before importing to preserve index 0 (black) and index 6 (default background color). Use standard true color RGB images with a transparent background for best results. You can always make manual adjustments once loaded.
To generate the raw byte string containing the color data of a given quadrant, right-click on it and select Copy Sprite Data (8x8). You can do the same if you want to copy 16x16 or 24x24 areas, being sure to right-click from the top-left of the area you wish to copy. This will generate each quadrant of data on its own line, left-to-right, top-to-bottom from the indicated area. This data can be used as part of plusBASIC's sprite operations. You can combine this with a custom color palette. Refer to the plusBASIC Reference Guide for full command syntax and instructions.

Recent versions of plusBASIC support 80-column mode via SCREEN 3. You can draw on an 80-column gridspace in Aquarius Draw by accessing the link with query parameter: ?s=80 or by selecting the option on the right-click context menu of the border zone.Since this is a major change in functionality, it requires a hard refresh to reload all properties in an 80-column compatible format. There may still be some oddities from this functionality such as trying to load 40-column scenes in this mode, or vice versa. Some of the intricate features like bloxel drawing may also behave strangely in some circumstances. This has not been extensively tested.

Refer to the plusBASIC Reference Guide for full command syntax and instructions.
 Once your scene has been created to your liking, you can generate Aquarius-compatible code (BASIC or Machine Language Assembly) by clicking on the Generate Code button (F6). Note that this button will not work if the scene is currently blank. The output provides a boilerplate template that automatically renders your scene to the screen and awaits user input. Both the BASIC and Machine Language variants are designed to allow easy expansion and modification, to create a more complete end product. You'll want to have at least 4K and preferably 16K expansion before exporting complex scenes, due to the extreme memory limitations of the stock hardware (with only 1.7KB usable).
BASIC — When outputting the code as BASIC, you have a variety of options including setting line number start points and removing spaces. This is helpful if you are attempting to retrofit the output code into an existing project. The BASIC code also includes a hint of machine language (via Mack Wharton) to fast fill the most commonly used background color of the scene, prior to populating the individual tiles via POKE. Note that POKING and PEEKING in BASIC is a slow operation on the Aquarius so the more sophisticated your scene is, the longer it will take to load on the device.
Machine Language — When outputting the code as Machine Language, you have the option to output as TASM-compatible or PASM-compatible. The machine language option includes a self-contained loader (via James Tamer) that can compile directly to a cassette-compatible app. This means that it becomes possible to generate blazing fast machine language applications, transfer them directly to a cassette and run them on a device, without dealing with secondary loaders, machine language to decimal conversions, DATA iteration or other complexities. The generated assembly exports the full 960 tiles of character and color data, which is perfectly fast in Z80 assembly but for space consumption you may wish to optimize depending on your scene and program requirements.
TASM Assembly Compiler — If you want to test the assembly code on an emulated or physical device, I recommend downloading TASM v3.2. This flavor of TASM runs fine even on Windows 64-bit and is very compact. After extracting the TASM files to a location of your preference, you can optionally add the directory to your system path so it is accessible from any command line. Next, save the Machine Language output via Aquarius Draw; if you didn't add TASM to your system path, you'll want to save the assembly file into the same directory as TASM.EXE. Finally, you can execute the command: TASM -80 -b input.asm output.caq This will create a CAQ file that can be loaded into an emulator. Taking it further, you can convert the CAQ to WAV using a tool such as CAQ2WAV.exe (included with Virtual Aquarius 0.72a). To run it, you can simply enter CLOAD and press enter, then play the cassette (or load it virtually). You should then see your scene come to life on the screen.
Screen Memory Dump Binary — A feature added in March 2022 supports exporting the raw screen memory area bytes to a file. Specifically, it will generate a 2048 byte file that contains all 40x25 bytes of character and color data. This data can be imported raw at memory location #3000 (12288) to immediately display your design on screen. Emulators including the excellent AquaLite and the older Virtual Aquarius support binary data dumping into specific memory locations. If you have a Micro Expander with the USB BASIC ROM, this can be a convenient way of loading in fullscreen visuals on-the-fly using a command within your BASIC source, such as: LOAD "TITLE.SCR",12288 and later LOAD "LEVEL1.SCR",12288 to instantly populate the screen visuals without requiring all of this data be housed in memory in one swoop. With USB storage, this means that you can have an unlimited number of scenes all loaded and managed within the same 2KB of RAM.
IMPORTANT: Due to quirks with end-line characters when copying directly from the text editor, you should always use the Copy to Clipboard content_copy button or the Save Code save_alt button to save the file to your computer. Otherwise, pasting the copied text directly into emulators will cause conflict.
(Some Aquarius+ functionality and code generation may change as the syntax evolves.)
| Option |
Description |
| Main Code |
Sets the BASIC line number to begin the main code at. |
| Fast Fill |
Sets the BASIC line number to begin the fast fill routine at. |
| Scene Data |
Sets the BASIC line number to begin storing the scene data at. |
| No Spaces |
Removes spaces in BASIC code to condense output. |
| Machine Language |
Converts code output to Assembly, with option for TASM or PASM. |
| Save Code save_alt |
Saves the generated code as a TXT or ASM file. |
| Save Screen Dump extension |
Outputs a .SCR binary file of screen memory (#3000-#37FF) for advanced usage. |
| Copy to Clipboard content_copy |
Copies the generated code into your clipboard. |
| Close Code Window cancel |
Closes the Aquarius Code Output window. |
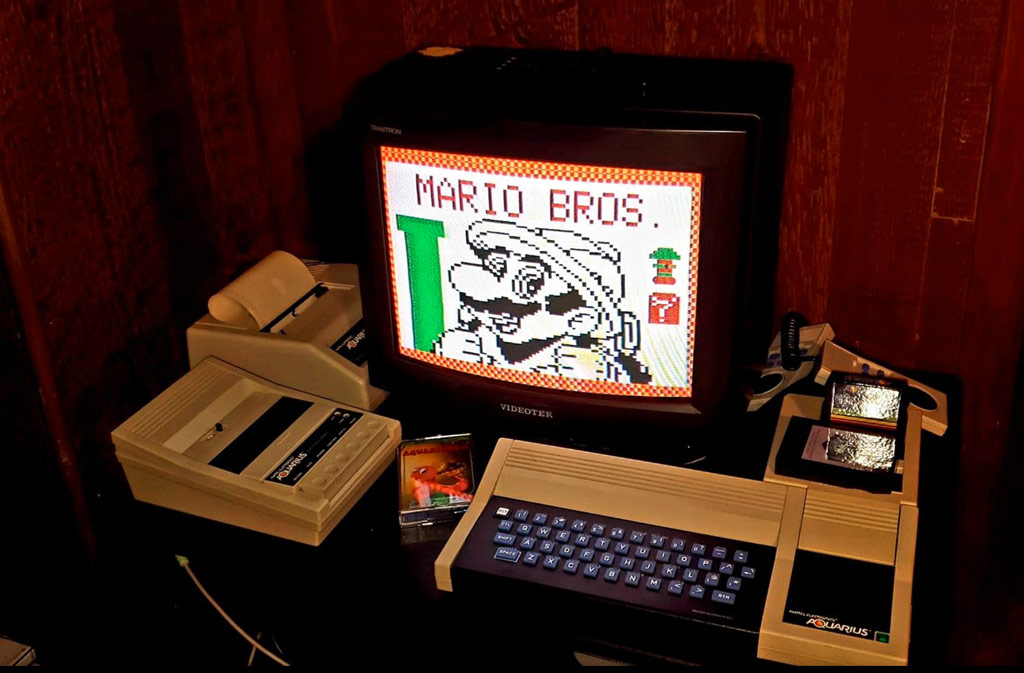
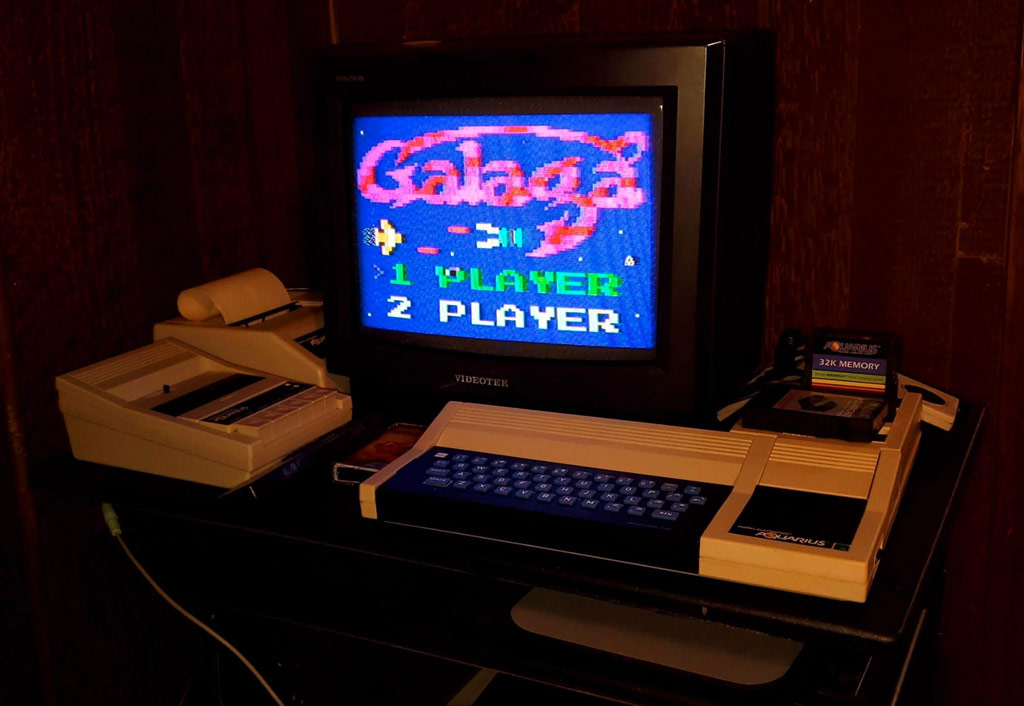
At any point during your creative process, you can preview the current design (including on a simulated noisy CRT), export the canvas to a high quality PNG for sharing or external modifications, or upload it to the Aquarius Draw Art Gallery for others to enjoy. To launch the Aquarius Image Output view, click on the Generate Preview photo_camera button or press F5.
Within a few seconds, the preview will be generated and displayed on the virtual Trinitron set. You will find several options at the bottom.
| Option |
Description |
| Simulate B&W |
Desaturates the image to illustrate how it might look on a monochrome TV set. |
| Simulate CRT |
Applies a variety of visual artifacts to the preview reminiscent of a noisy 1980s CRT. |
| share Upload to Gallery |
Opens the Gallery Upload view for entering optional metadata and upoading to the public gallery. |
| camera_roll Save As PNG |
Generates a high resolution PNG and saves it to your computer for external use. |
| cancel Close |
Closes the Aquarius Image Output view and returns you to the canvas. |
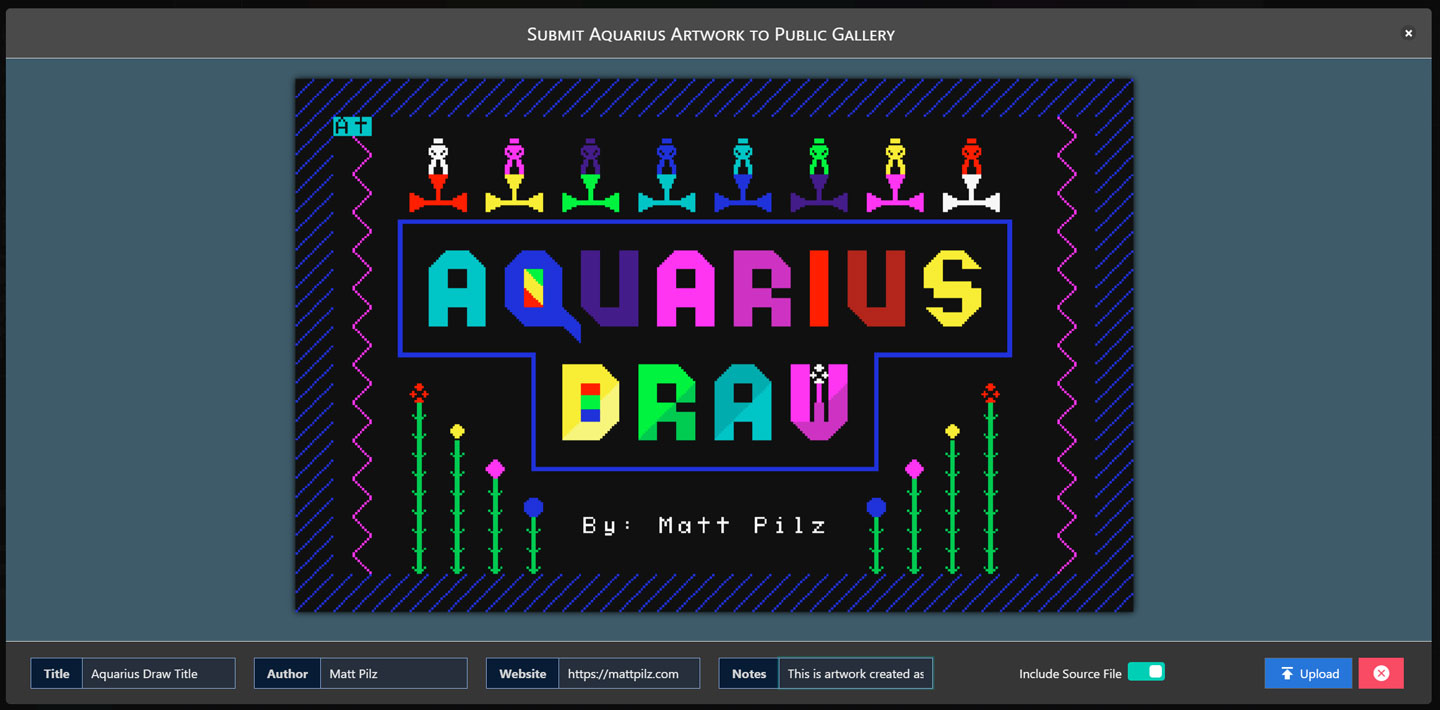
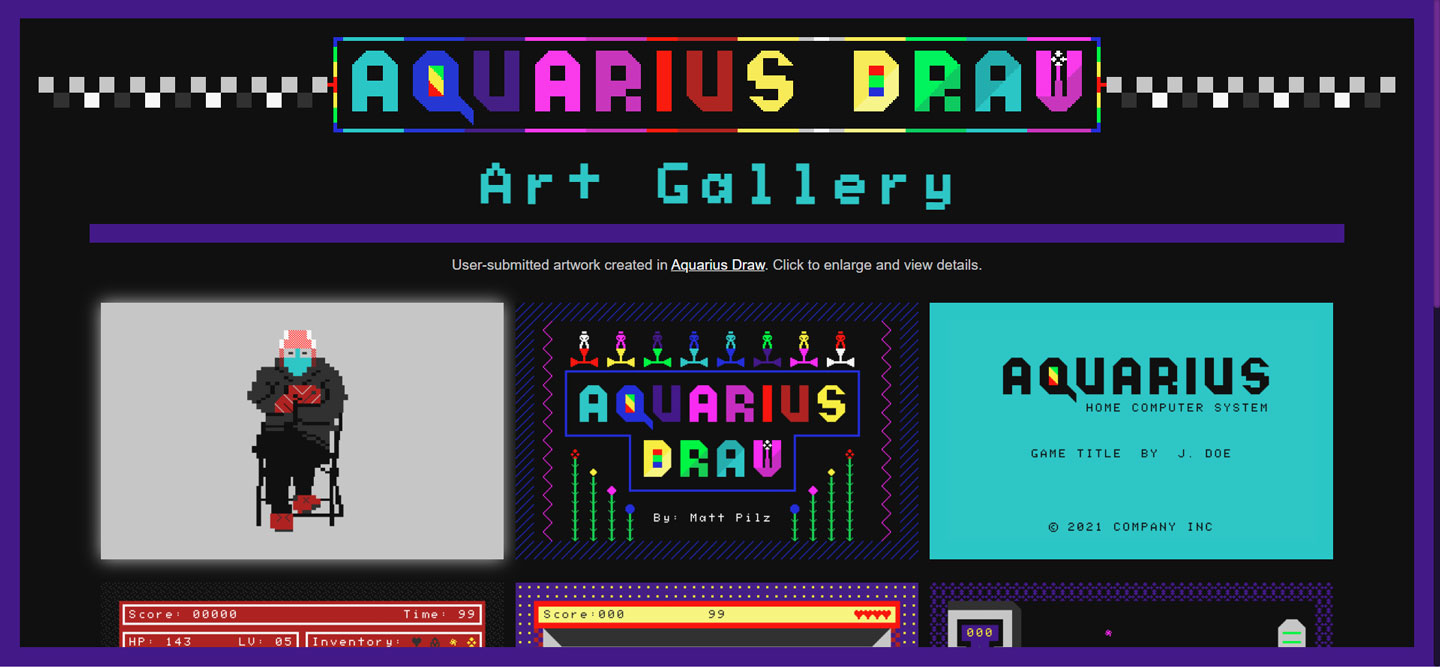
Online Gallery
If you would like to showcase art created in Aquarius Draw, you can select the share Upload to Gallery option. This will open a separate window containing a large preview of the artwork, along with several optional pieces of metadata that you can include if you wish. All of the fields are optional, but if included will be cited if the user enlarges your artwork on the gallery view. By default, the scene data itself will also be submitted as part of the gallery view so that other users can open the original within Aquarius Draw. You can omit the source and include just the image by toggling the Include Source File option.
After uploading the file, you will see a direct link to the image as well as a link to delete it if you wish (you should save the delete URL to a safe location so you have it if you decide to delete the image in the future, such as to replace it with an improved version.)
Have Fun!
Like this free tool? You can support me by subscribing to my YouTube Channel, checking out my Tech Blog, following me on Twitter, or tossing some change into my Tip Jar.